Jordan was very kind to give me feedback on the things I worked on during the previous week so I tried to adress those and adjust some additional details. This was the plan I made:

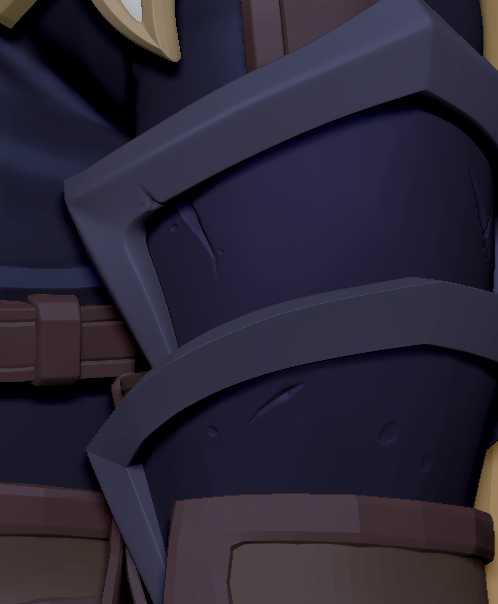
Damage/wear&tear on guards - the previous chips/damage I made to the guards ended abruptly (see previous post), Jordan reminded me to think about how the damage/chip happened, and that if I do, I will realise there can't be a significant damage on an inner edge if it would not affect the neighbouring area/other surface as well. The chips/damage I made were also too small to be read from further than up-close. In the Wild Rift reference, one cannot see too much damage like this, but I felt like it does add a bit of realism and "story" to the character so I included them and enlarged some of them in the end:


On the last picture I have also included how I resolved the shoulder pauldron according to more feedback - beveling the edges (for baking purposes), finished up the design and fixed how the silver plates resolved against the gold trim. The plates were modeled with ZModeler, adjusted with SnakeHook, and the damage was done with a combination of the OrbBrushes, customised alphas and brushes like TrimDynamic or DamStandard.
I subdivided&cleaned up the belts, which I also made a bit thinner and more bevelled according to feedback, and I also added asymmetrical folds to the pants to better show the folds on pants are bunching up >because of these straps.

As Jordan pointed out, the frequency of detail on the glove was too small - at the size of the detail I would need to bake the hands on a very big map to even show the detailing in the normal map. I changed up the tension folds according to the feedback and I also sculpted the hands and nails. The nails are polygrouped, therefore more easily adjustable while still part of one mesh with the hand. First I thought the details and stylization should be more significant but after reviewing the Wild Rift
reference, it was clear that the hands are smoother than I thought.
 |
| Smoothed out |
 |
| New glove |
The next piece of feedback made me realise I should think way more about the technical construction of the clothes/armor pieces. Jordan pointed out I should connect the boot cuff pieces to look like an actually constructed boot. "
Adding little things like that helps on a subconscious level when people look at the character. " This is how I connected the cuff:
 |
| 1) Detaching the "V" part from the boot subtool, merging it with the cuff in ZBrush. |
 |
2) GoZ into 3dsMax, using symmetry and basic polygon modeling techniques (loop, target weld, extrude..) to connect the V part with the external part of the cuff.
|
 |
3) GoZ back to ZBrush, SnakeHook/Move to adjust to the shape of the inner cuff.
|
 |
4) Polygroup, Crease, Subdivide, add damage and bevel around the edges, and lastly, run OrbCracks around the intersection of the inner and outer part of the cuff to show they are connected.
Next I polygrouped and cleaned the arm belt:

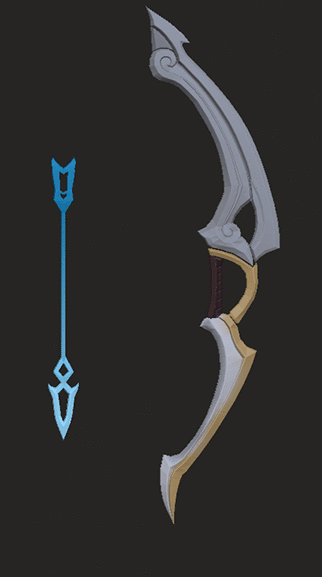
Lastly, I received feedback from my tutors, pointing out that the shape of the bow and arrow could be more dynamic&elegant. I totally agree, I made some initial shape adjustments with SnakeHook and local symmetry:
I still need to clean it up in Max and add a more fitting bevel - adding that to the next deadline. It's time consuming to keep things clean at this stage but I still think it's way more fun than figuring out painful retopo later. Plus having so many adjustable subtools will allow me to have something to re-use in my future (non-university) projects.
I also slimmed down the boots a little in the ends as per my tutor's feedback. Current state of the lady. We're gettin' there:
|


Comments
Post a Comment