Posts

Showing posts from April, 2020

FMP: Ashe - Bow, quiver, arrows

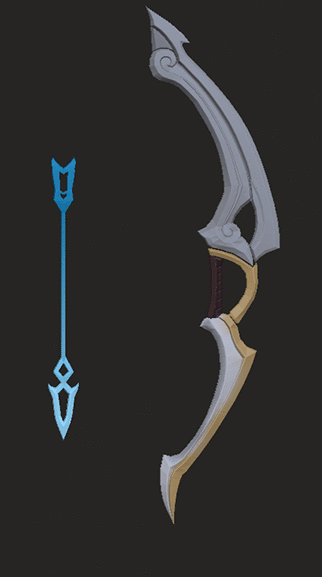
This week I got back to the Ashe sculpt. I am liking how she looks more and more as she gets closer to the finished stage. I really want to do her justice, so I decided to take the bow feedback I got from my tutor a little further and revise the shape design I had in mind for it :) At the start, I was following the in-game version almost to a vertice but as it was pointed out to me, I have reworked a lot of her areas to fit the Wild Rift visual target, and in the end, the bow should follow that path too. 

I made the following gif to illustrate its journey :) I did some fun shape design exercises pre-overpaint which helped a lot :)


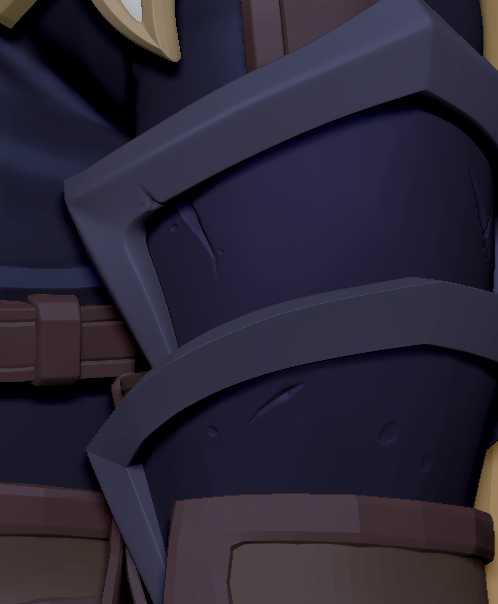
With the increased budget compared to the in-game Ashe model, I decided it would be a good idea to add a prop which was not modelled in the original - the quiver, which I saw on the Wild Rift Ashe model:

Unfortunately I could not see it in its full view, so I had to improvise :) I did a rough concept, trying to include elements, curves and shapes which I have already designed on the rest of the sculpt:

I modelled it in 3dsmax, adjusting the design if I felt like the shapes/ details could have been solved better and more efficiently than in the concept:

I GoZ-d the model into my Zbrush file and I prepared it for subdivision. Polygroup by Normals worked well here as the edges were separated by distinct angles. I had to Polygroup bits manually still but definitely less than I would have had to if I started Polygrouping all by hand :) I also added stitches to indicate that the middle part is leather.


Subdivided:

As the quiver was not a part of the original concept, I had to figure out a colorway to fit with the rest of the model. I "concepted" 3 possibilities:

I ended up choosing the first one as it was most indicative of the middle part being leather and it looked nicest when put on Ashe's back:

I felt like the arrows needed a shape adjustment as well so I played around with them in Max and tried to create cleaner angles. I also looked at the Wild Rift reference and noticed the feathery ends have more parts than my original arrows, adjustments followed :)


I also did not like how sharp and flow-less the golden floating wing looked so I adjusted it a little :) I tried out a different colorway on it too but at the end I thought the full gold finish still looked the best:


Detail of the new arrow ends :) Hope everyone is well in these hectic times! 

FMP: Kled - Rigging, posing, presentation

I really enjoyed painting the Kled pedestal I showed in my previous post so I decided to stick with my Kled project for a little longer to take a break from Ashe :) Over the past few days I think I managed to bring it into a presentation-worthy state - this included rigging, posing, adding props and alphas for posing and rendering in Marmoset :)

Current state (Marmoset render)

I rigged Kled and Skaarl in 3dsMax using the CAT rig following this tutorial: https://www.youtube.com/watch?v=IaHXYgUmVF8 - don't mind Skaarl's textures in the second picture, they weren't updated yet.

When it came to posing, I felt like something was missing. Even with the pedestal it seemed quite plain. My first idea was to add some sort of a rock to allow for a more heroic pose. Second possibility was some kind of a barrel to be more indicative of the pirate-y vibe of Bilgewater which the skin is supposed to emulate. I also wanted to add drool alphas to give Skaarl a bit of a goofy vibe and add visual interest and flow to the scene:

 I felt a little lost with the barrel design and Jordan very kindly offered to help me out and concepted these two amazing ideas:
I chose the barrel which I subsequently modeled and unwrapped in 3dsmax, and textured in 3dcoat :) 


Modeling next to reference.


Texturing in 3dcoat :) I textured the barrel alone first because my scene kept lagging with all the assets in. I then posed Skaarl with a barrel proxy, attached all objects together and brought them in for a final polish and adding shadows. It was a back and forth between 3dsmax, 3dcoat and Photoshop.


In Photoshop, I created very basic drool alphas. I never painted drool before but it was easier than I expected :) I added the alpha channel using a mask in Photoshop.


I added the shadows and adjusted the pose according to Jordan's feedback. I imported the alphas into 3dcoat but I found out 3dcoat does not seem to display them correctly:

I followed this tutorial https://www.youtube.com/watch?v=q_e_YZfTJko to solve this issue :)


In 3dcoat, I used the Freeze and Hide tools a lot to only apply brushstrokes (e.g. for the shadows and occlusion) to one object. 


At this point, I got one last great point of feedback from Jordan, and that was to gradually decrease the lightness of the drool as it falls down. I was thinking I should do this too but I have previously duplicated the alphas to save texture space. After a quick review I realised I still have plenty of texture space left so I made the drool textures unique and re-packed the UVs for the barrel, so I could easily make them darker as they fall. I also added some alpha padding which I forgot to add before :)

I did a final pass on the pedestal textures, applying a black and white overlay to check the values and darkening/lightening with greys/whites on a light opacity Overlay mode. I added some Color dodge accents and imported the model into Marmoset. As the model is handpainted, with diffuse only, I used an Unlit material which will show the texture best. Then I took the renders you see at the top of the article with some nice post-processing effects. 

I'm leaving Kled sit now for a few days to escape the tunnel vision and really ensure I'm okay with posting him and Skaarl as they are :) Right now I'm loving how they turned out and I'm so grateful to everyone who gave me feedback and helped me get them to this state, because I sure wouldn't have been able to do it without them. In the meantime, I'm going back to Ashe! 

FMP: Kled - Pedestal

I admit that over the past few weeks I've gotten a little tired of my Ashe project. Fortunately I had one more project to finish presentation for - the dear Kledward Teach, which I was looking forward to get back to. Unfortunately, my laptop did not share my enthusiasm :D I think the continous daily overuse of it (ZBrush + 3dsmax + PS + PureRef + Hannah Montana soundtrack on Youtube open at he same time) caused it to get slower in the past few weeks, so much so that the textures which normally loaded in a minute in 3DCoat took 15 minutes to load (+ 2 crashes) and subsequently also took 15 minutes per each autosave :D Well, I tried to use the time strategically and write this blog during the loading time. If Hannah Montana taught me something, it's that Nobody's Perfect and I definitely can't blame my laptop for not being perfect - everybody makes mistakes, everybody has those days and "If things don't turn out the way you plan, figure something else out! Don't stay down! Try again!" *religiously chanting as I reload my Max file for the 10th time :)))))*

For the presentation, I wanted to go for a simple pedestal. Katia was super helpful and suggested I use the Bilgewater ARAM map as a reference for the concept. I liked the base for the turrets a lot, so I chose to do a pedestal with similar shape/materials :) She also gave me some more awesome feedback on the metals and bounce light which I will show applied later in this post.
Pedestal reference: Bilgewater -Butcher's Bridge by Jeremy Page

Basic modeling (old textures in max):


Hallelujah, everyone loaded in 3dcoat :) Replaced geo + re-assigned the textures. The model is not rigged/posed yet though, just a provisional pose to check the scale. I wanted to block the colours out in Photoshop but then I found out that I get errors when importing/reimporting things in and out of PS. I did not have time to troubleshoot or re-install so I just went with the fact that I won't be able to use Photoshop for this one. I then did the color blocking in 3dCoat texture viewer.


Again, I hate how much I sound like I'm complaining but I'll rather cover my back than pretend nothing's happening :D So just to prove that I'm not making stuff up, this is what I got every time I tried to export to PS:

for about 10 minutes, with a crash following :D I'm saving to my external drive, and have enough space on my disk, and the .3b file only has 500 MB which should not be that much considering there are 3 different objects and some layers, so I'm not sure what's up. I'll look into it when I have more time though.
I started with a rough sketch, concepting the cracks as I went. I chose a little bit of a different colour palette than the Bilgewater one because it seemed a bit too contrasted and I wanted the pedestal to be understated in comparison to the Kled&Skaarl models.
I defined the forms&cracks with simple painting in 3dcoat. I added some moss to suggest the Bilgewater vibe.

 
I applied Katia's Kled feedback - bounce on boots, legs, arms and clearer read on the sword, along with the green "oxidization bits" which can be seen  for example in the new  Default Gangplank skin texture and add to the Bilgewater aesthetic.
I then got some very helpful feedback from Jordan which made me realise how much skill I still lack in form definition and painting in general :D I applied the feedback on the pedestal and on Skaarl. Still missing a form shadow and additional Skaarl's drool which I will want to add - these will be added when I pose them. I'm also thinking of using alphas to add some flying drops of drool to make it a bit more dynamic :) 


I'll probably go over the pedestal again when I lose the tunnel vision. I can try to rig them in the meantime .)

FMP: Week 11 - more feedback time :)

Jordan was very kind to give me feedback on the things I worked on during the previous week so I tried to adress those and adjust some additional details. This was the plan I made:


Damage/wear&tear on guards - the previous chips/damage I made to the guards ended abruptly (see previous post), Jordan reminded me to think about how the damage/chip happened, and that if I do, I will realise there can't be a significant damage on an inner edge if it would not affect the neighbouring area/other surface as well. The chips/damage I made were also too small to be read from further than up-close. In the Wild Rift reference, one cannot see too much damage like this, but I felt like it does add a bit of realism and "story" to the character so I included them and enlarged some of them in the end:


On the last picture I have also included how I resolved the shoulder pauldron according to more feedback - beveling the edges (for baking purposes), finished up the design and fixed how the silver plates resolved against the gold trim. The plates were modeled with ZModeler, adjusted with SnakeHook, and the damage was done with a combination of the OrbBrushes, customised alphas and brushes like TrimDynamic or DamStandard.

I subdivided&cleaned up the belts, which I also made a bit thinner and more bevelled according to feedback, and I also added asymmetrical folds to the pants to better show the folds on pants are bunching up >because of these straps.


As Jordan pointed out, the frequency of detail on the glove was too small - at the size of the detail I would need to bake the hands on a very big map to even show the detailing in the normal map. I changed up the tension folds according to the feedback and I also sculpted the hands and nails. The nails are polygrouped, therefore more easily adjustable while still part of one mesh with the hand. First I thought the details and stylization should be more significant but after reviewing the Wild Rift reference,  it was clear that the hands are smoother than I thought.

Smoothed out
New glove

The next piece of feedback made me realise I should think way more about the technical construction of the clothes/armor pieces. Jordan pointed out I should connect the boot cuff pieces to look like an actually constructed boot. "Adding little things like that helps on a subconscious level when people look at the character. " This is how I connected the cuff:
 1) Detaching the "V" part from the boot subtool, merging it with the cuff in ZBrush.

2) GoZ into 3dsMax, using symmetry and basic polygon modeling techniques (loop, target weld, extrude..) to connect the V part with the external part of the cuff.

3) GoZ back to ZBrush, SnakeHook/Move to adjust to the shape of the inner cuff.


4) Polygroup, Crease, Subdivide, add damage and bevel around the edges, and lastly, run OrbCracks around the intersection of the inner and outer part of the cuff to show they are connected.


Next I polygrouped and cleaned the arm belt:


Lastly, I received feedback from my tutors, pointing out that the shape of the bow and arrow could be more dynamic&elegant. I totally agree, I made some initial shape adjustments with SnakeHook and local symmetry:


I still need to clean it up in Max and add a more fitting bevel - adding that to the next deadline. It's time consuming to keep things clean at this stage but I still think it's way more fun than figuring out painful retopo later. Plus having so many adjustable subtools will allow me to have something to re-use in my future (non-university) projects. 

I also slimmed down the boots a little in the ends as per my tutor's feedback. Current state of the lady. We're gettin' there: